
Art Galleries are nothing new when it comes to decorating, but I always find myself fascinated when I come across a new image of a room containing an art gallery. Art galleries are a great way to add visual interest and color to a room, and can range in size from a small trio up to an entire wall of artwork. Art galleries can also greatly vary by theme, from personal photos to virtually any artwork you like.
 |
| Decor Pad |
 |
| Decor Pad |
 |
| Decor Pad |
 |
| Decor Pad |
As these pictures show so well, an art gallery can add beauty and a personal touch to virtually any room.
So far, we have two galleries in our home - a small photo gallery in our living room:

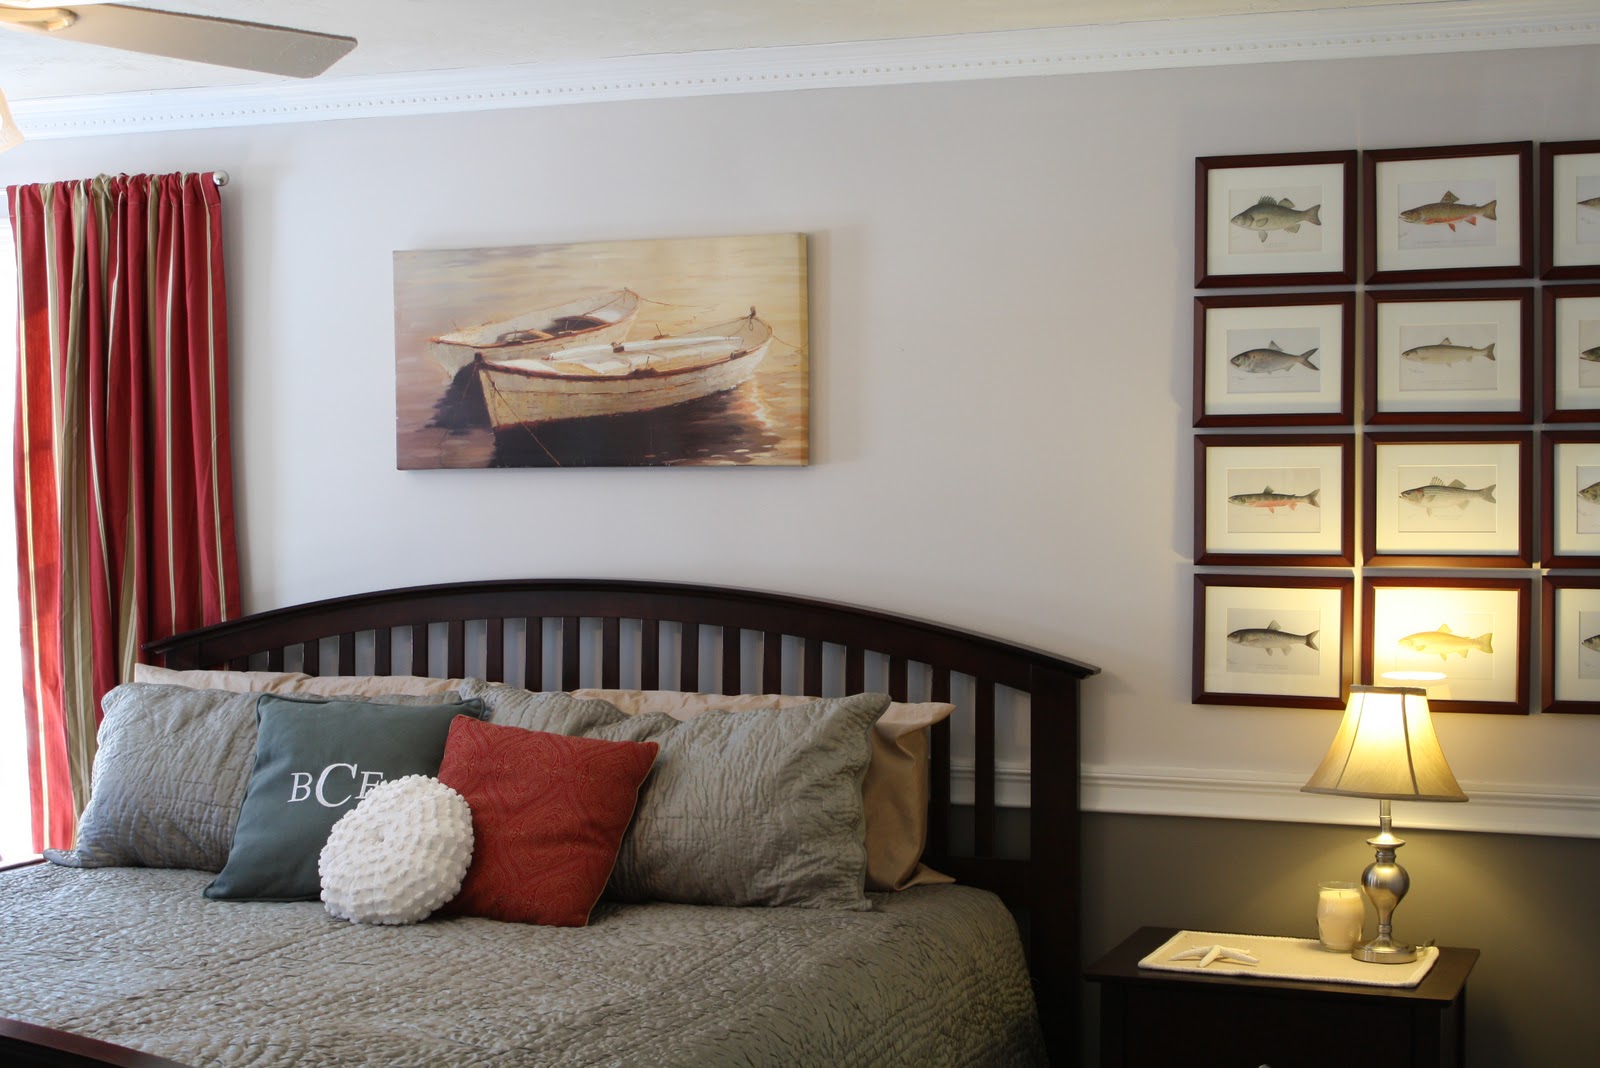
And a larger, vintage art gallery in our master bedroom:

Read on for my tips on how to create and hang photo and art galleries in your home!
Creating an art gallery:
There are many easy and inexpensive ways to create your own art gallery, right from the comforts of your own printer! Many websites and libraries, including the New York Public Library, have online image databases of many beautiful, vintage prints that can easily be printed out and framed. For free.
Here are just a few sites to check out:
And not to worry- you aren't violating any copyright laws by printing images from these websites as their copyrights have expired.
Besides looking online, check out art books at thrift stores and bookshops for inexpensive artwork to frame. Last summer I bought a $2 photo book of Nantucket images. Being the sea lover that I am, I love looking at the pictures in this book. It also has sentimental value because my brother is a chef on Nantucket (check out the amazing restaurant here) and my parents and I had an amazing time visiting Andy and exploring the island last summer. A few months ago I went back to the same store (Job Lot) and bought another copy of the book. With my second copy, I cut out many of the images and created a mini art gallery that is currently om display on the "big blue wall" in our family room. Read more about this space here.

Lastly, Etsy.com is a great place to buy inexpensive, original artwork from small businesses and artists. Definitely worth checking out and often times many artists on this website will work with you to customize your artwork based on what you're looking for.
Because our home has a coastal colonial style, I knew I wanted some kind of coastal artwork gallery. I also knew I had a big, empty wall in our master bedroom. When I stumbled across some cool vintage fish prints online, I knew that I had just killed two birds with one stone (gross expression, but so true here!) because the colors of the images matched our bedroom and went along with our theme.


I copied and pasted each print into a Microsoft Word document and used the picture tools to resize the image to 5x7" and then I printed out each image onto leftover white cardstock from our wedding. I framed the fish in dark wood picture frames purchased for $3.99 each at The Christmas Tree Shop. The entire gallery ended up costing just under $50. Easy (and cheap) enough, right!?! Well, here comes the only hard part of this project....
Hanging an Art/Photo Gallery:
There are two main ways you can display your gallery. Here is a beautiful gallery that is deliberately haphazard in its display:
 |
| Decor Pad |
And here is a gallery where the frames are perfectly spaced:
 |
| Decor Pad |
If you prefer the haphazard style (which is very pretty!) then hanging your gallery will be relatively simple and just require that you play around with the location of your frames until you are happy with the layout. This how-to is going to focus specifically on how to hang a gallery with picture frames evenly spaced (which is my personal preference). It is more time consuming to hang a gallery this way, but I think it is much more striking and really allows the artwork to take center stage.
So here's how I painstakingly measured and hung each frame (sorry no pics to help explain this process - I did this step before my blogging days):
- I laid out a roll of wrapping paper with the white side facing up.
- I laid each picture frame out on the paper and arranged them into a position I liked, with 4 rows of 3 pictures.
- To make the distances apart of each frame exact, I used a ruler to measure and identify how much space I wanted in between each picture left and right, top to bottom. I believe I settled on a spacing of 1/2". I then measured and moved each picture frame so that there was the 1/2" of space in between each frame on all sides.
- I then traced the outline of each picture frame onto the wrapping paper.
- I then traced the outline of each picture frame onto the wrapping paper.
- Here comes the most tedious part: I measured the distance of the nail hole on the back of one of the picture frames to determine exactly where to draw the nail hole on each frame on the wrapping paper. This means I measured how far down from the top of the frame the nail hole was and how far from the left and right side of the picture frame to determine the exact location of the nail hole. This step is extremely important if you want your frames to remain perfectly spaced when you hang them on the wall. For example's sake, let's say that the nail hole was 1" down from the top edge of the frame and exactly 3.5" from the left and right edges of the picture frame. I then had to measure and draw a nail hole onto each picture frame outline on my wrapping paper. Tedious? Yes, totally, completely. Did it work like a charm, though? You betcha!

Once the hard part was over, I taped the wrapping paper up on the wall. All of the holes to place the nails were easily identifiable now, and best of all - perfectly spaced!


It was a pain to spend so much time measuring, but it was so worth it. When I first hung my living room photo gallery (described later in this post), I just eye-balled it and hung nails in the wall...after several reattempts I settled for the best arrangement I could get and called it a day. Check out the pictures of the living room gallery below to notice the difference measuring really can make when hanging a gallery.
On that note, I say live and learn! Hopefully you've learned some new and helpful info on how to hang a gallery in your home.
Creating a photo gallery of your friends/family:
In our living room, we have a small sepia photo art gallery above my reading nook. While using personal photos for decor seems to get mixed reviews, I believe we shouldn't take home decor too seriously and you should make your home a space that is comforting to you. If that means surrounding yourself with pics of loved ones, I say go for it. Personally, I love looking at pictures in albums and books, and each year I create a new digital photo album. Because of this, I don't display too many photos on our walls. However, I knew that I wanted to have a small, sepia photo gallery of my husband and I in our living room. I like using all black and white (or in this case, sepia) photos in a photo gallery to give the photos a more cohesive look.

For this gallery I chose sentimental pictures of my husband and I with one photo representing each year that we've been together. Not surprisingly, each picture was taken on a coast somewhere (we are major water lovers), including the Yacht Club at Disney for a New Year's celebration, Cape Cod during our engagement party weekend, Fiji during our honeymoon, and a day trip to Kennebunkport the first summer we began dating. Awww :-) (Sorry, couldn't resist - but hey, we're newlyweds!) I used photo paper to print the pictures from our own printer...although many websites such as Snapfish and Vistaprint offer frequent discounts on ordering prints for super cheap. You also can submit printing orders to Staples online or just go where you typically go for ordering your pictures. I've printed pictures from our printer before and I've always been happy with the quality. Because these pictures will be displayed on your wall, if your printer quality isn't the best for printing pictures then I would suggest ordering prints.
I chose matching 8x10" white picture frames from The Christmas Tree Shop for around $5 a frame. The frames came with white mats, but I purchased deep blue 8x10" mats from Michael's for only a few dollars a piece. Upgrading your mats is an inexpensive way to give your photo gallery a high end look. I like how the deep blue of the mats matches the darker blue paint under our chair railing. I was actually inspired by this picture when deciding to buy the blue mats:
 |
| Inspiration for Home |
Here are a few more tips to consider when creating a photo gallery of your friends/family:
1) Display your photos in frames that are all the same color (such as an all nickel finish, etc.) or several matching colors, such as silver, black and white, etc. *If you have a lot of mismatched (and not in a good way) frames you'd like to use for your gallery, that's nothing a bottle of spray paint can't fix!
2) Don't be afraid to change out your photos from time to time. It's an easy and fast update. Add Christmas photos in December, etc.
3) You can use a variety of different sized frames or frames that are all the same size for your gallery. Both of my galleries have identically sized and colored frames so that the photos and art will stand out..but you can't go wrong either way.
4) You don't need to spend a lot of money on picture frames! Most of the frames in my home are purchased from Ikea, Walmart or The Christmas Tree Shop.
I am linking this how-to up with the following link parties:
I am linking this how-to up with the following link parties:
Monday: The DIY Showoff, Between Naps on the Front Porch, Skip to My Lou, The Girl Creative, House in Roses, Making the World Cuter, Keeping it Simple, Sumo’s Sweet Stuff, Twice Remembered, Super Stinky Boys, Mad in Crafts, and Creating Really Awesome Free Things.
Tuesday: Coastal Charm, Hope Studios, New Nostalgia, The Lettered Cottage, Trendy Treehouse, All Things Related, The Herber Family, Tip Junkie, The Gypsy Corner, and Creating a House of Grace.
Wednesday: Someday Crafts, Savvy Southern Style, Faded Charm Cottage, Fireflies and Jellybeans, The Thrifty Home, Blue Cricket Design, and Night Owl Crafting.
Wow - this is a wonderful post ... very detailed and informative! I think that you did a great job on your bedroom gallery wall (it was my favourite)!
ReplyDeleteThanks for all these tips! I LOVE galleries! It's so hard to make them perfect so I appreciate the tips. The one thing that bugs me is when some of the pictures get crooked when hanging and then the whole thing looks off. For the last one we did, we used sticky 3-M hangers to hang the frames so they wouldn't move and get off center. Worked great!
ReplyDeleteYour galleries look so nice, Erin. Thanks for the tips on where to find nice prints. Before the internet, it wasn't so easy. I'd like to create a family gallery wall in my mom's new house...
ReplyDeleteThis post is just what I needed, as I am thinking of switching two walls, my dining room and living room walls. Making the living room one a gallery wall now! So I needed some good info.
ReplyDeleteThanks, Linda
Thanks for posting this! I want to do a similar gallery with very small frames in one of our hallways. It's been on my to-do list for a while, but hopefully this post is going to make me get to it!
ReplyDeleteNice gallery! I am a huge fan of NYDPL and VP. Actually just today I was using their artwork again.
ReplyDeleteThis is really a great post. I would love for you to link this up to my party. It's too good not to share.
ReplyDeleteMay I ask which site you found the fish prints on? My daughter would love them for her office.
ReplyDeleteFabulous post! I love the gallery in your bedroom. Fabulous. Featuring this on my site, Monday. creativecatalog.blogspot.com
ReplyDeleteI have a grouping of pictures over my bed and darned if I didn't get them crooked. I'm just living with the wonky-ness. It suits me.
ReplyDeleteGreat post and I liked all of the photo examples!
I'd have to go with the haphazard way!!
ReplyDeleteYours looks very neat and clean!
Found you at Delightful Order!
Hi Tina,
ReplyDeleteI am pretty sure I found the images on the third website I listed (vintage printable) - I just tried searching again and the site is loading very slowly. I was able to find one of the fish prints on the first site, too: http://commons.wikimedia.org/wiki/Main_Page
Please let me know if the sites don't work for you - I still have the Microsoft Word document I pasted the images into and I could email this to you.
Shannon -
ReplyDeleteI am so excited you'll be featuring this post on your blog! I'm looking forward to it as well as checking out your blog!
Thx again :-)
Try as I may...I can't get the Vintage Printables to load this morning either. ?? If your offer still stands to email them to me, I'd appreciate it. tinab158 at hotmail dot com
ReplyDeleteThanks so much, Tina
Hi Tina,
ReplyDeleteI'm emailing you right now :-)
Happy TGIF!
Erin
Great post on creating a gallery. Thanks for joining JFF.
ReplyDeleteThanks for the inspiration. I am going to do a gallery display of different size shadow with seashells for summer. This has helped a lot. ~~Sherry~~
ReplyDeleteThank you so much for writing such an informative post. I bookmarked it for future use, I am hoping to create a photo wall in the near future.
ReplyDeleteHave a great weekend!
Karen
This is such a great idea for hanging! We are redoing our boys' bedroom and planned to use the white version of your Xmas Tree Shop frames to do a gallery of their artwork on the wall behind their beds. I was stressing about hanging it neatly, now I've got a plan, thanks to you!
ReplyDeleteVisiting today from Junkin Finds Friday at A La Carte!
I found your site from your comment on YHL. Love all the ideas and the sites for free prints! Exactly what I was looking for (and we are fellow water-babies, so your home brings lots of inspiration!
ReplyDeleteThanks!
Anna
Fabulous tips and inspiration! Thank you for sharing!
ReplyDeleteThanks for linking up to Making It With Allie last week! I can't wait to see what you have for this week!
AllieMakes.Blogspot.com
I love all the pictures of the fish.
ReplyDeletelisa