
My Mom introduced me to the fabulousness that is Ballard's Design about a year ago. Perfect timing since that was right around when we officially became homeowners! That is until I looked a little more closely at my Ballard wishlist selections - specifically the prices. While I can't bring myself to purchase a lot of the furniture and even accessories from BD due to their hefty pricetags, that doesn't mean I can't enjoy the BD catalog as design inspiration, right?!
I am particularly inspired by how Ballard Designs can make home offices look gorgeous while at the same time being practical. The office swivel chair below is gorgeous and looks pretty comfy, too. However, it's listed for $839 on sale for $699. I want to be comfortable when I'm working - but I'm definitely not comfortable shelling out 700 smackers for this chair, beautiful as she may be.
 "Milan Desk Chair") |
| Ballard Designs |
BD can even take something as small and simple as a corkboard and recreate it as a vintage beauty.
 |
| Ballard Designs |
These range from $99 up to $299, depending on the size of the board. Yes, you just read $300 for a bulletin board. Crazy, huh. Wait it gets better. The bulletin board below is sporting a $500 pricetag.
 |
| Ballard Designs |
I have noticed on my favorite DIY blogs that many folks out there are recreating this look on the cheap. I jumped on that bandwagon awhile ago, too, and have created not one, but two bulletin boards similar to the BD versions....along with a chalkboard for around 20 bucks a pop. I will post about these DIY projects in the near future.
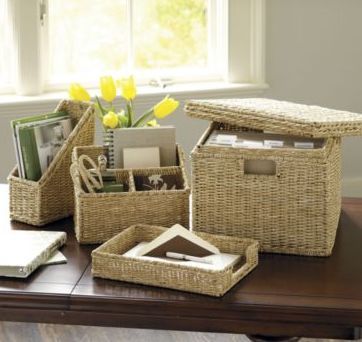
Good ole Ballard D can even make a file system into a thing of art. And wouldn't you know it, my husband has mentioned that we should get some additional file storage, now that he's doing some occasional work from home. Currently we have four plastic storage bins (filled with my teaching files) that look like this:
| Plastic Storage Drawers |
And we also have one of these (which we use to share our important documents):
| Hub Pages |
While they're doing the job storage-wise, they are both kept outta sight for obvious reasons in a guest bedroom closet. We also have various stacks of papers inside coffee tables, end tables and desk drawers - all just waiting to be organized. Clearly we were due for more file storage. Before running out and buying more of the boring plastic bins, I knew that somewhere out there existed the perfect solution for our file storage needs that is functional and wouldn't require banishment to a spare closet.
So, of course, the first thing I did was pull out my latest Ballard catalogue and I opened up to the home office section to get ideas. I fell hard for these ottomans:
 "File Storage Ottoman") |
| Ballard Designs |
There are so many things I love about this. I love that it's not only a decent-sized file storage system, it's also an ottoman! That means it could be proudly displayed in virtually any room of the house and provide additional (pretty!!) seating! I also love that it has wheels so it can easily be moved and that it's relatively small in size. Finally I love that you can customize the fabric based on many different colors and patterns. Prices for this ottoman range from $299-527 based on your fabric selection. The specific ottoman above would set me back $419. While this piece is multi-functional and attractive....I still felt $419 was too much to spend - especially since I was planning to purchase several file systems. That could add up really quick.
My most recent BD catalogue features a woven basket file storage system for $60, pictured in the far right corner below.
$60 is actually a pretty fair price (at least compared to the ottoman)...but I knew I would need at least 3 of these puppies which would bring me up to almost $200. I also knew I could recreate this for much less...which is exactly what I did!
Here's how I made Ballard-inspired file baskets for $20 a pop:
I purchased three baskets from Michael's for $14.99 each (these were on sale from originally $29.99). Michael's has pretty good sales, especially on baskets and picture frames so I knew this was the place for me to check out first.

I also purchased a file frame kit (letter size) from Office Max for around $15.00. This kit comes with a set of 4 file frames, so I only needed to buy 1 kit and I still have 1 file frame leftover. This set is very similar.
The great thing about these kits is that you can customize the size of your file storage by cutting the poles to your desired size. There are 2 easy ways to do this:
#1) If you have a larger storage basket (large enough to match the minimum size listed on your file frame kit - mine was a range between 22-36"), the first thing you should do is measure the inside of your basket to determine exactly how long you want your file frame to be. If you would like your file frame to be a size that is in between the range provided with the file frame kit you can easily just use pliers to snap off your desired size with pre-grooved notches and assemble the frame following the directions on the box.


Then place the frame inside of the box and voila, you're done! If you want a file basket size outside of the range of your file frame kit, move on to #2.
#2) If you're like me and using a smaller-than 22" basket (because you excitedly bought baskets that were on sale for a great price without actually measuring), you can also easily cut the poles to a customized size. It took less than 10 minutes to cut all 3 file frame poles for my baskets. Just like #1 above, the absolute first thing you should do is measure the inside of your basket to determine how long you want your file frame to be. Next, I snapped the poles down to the shortest notch of 22" (see #1 for more info on this). I wanted my poles to be 11" long to fit in my basket, so I hubs simply used a ruler to measure and mark off 11".

Next, my hubs used a small saw to make the cuts. It didn't look too hard to do and if my husband didn't enjoy using his tools so much than I would have done it myself. But I didn't want to take that fun away from him. :-)

Once the poles were cut to 11", I assembled the frames following the easy-peasy directions on the box. Took maybe another 10 minutes, if that.

Finally, I placed the file frame inside the basket.


Success! It looks just like the Ballard Design version (except my baskets have cool side handles for easy transport)! My baskets are also the same size as the BD version - yet cost a whopping $20 total per basket....or $60 for all three baskets. Essentially I was able to recreate 3 BD file baskets for Ballard's price of 1 basket!!! Goooooo, me!

The *best* thing about these file storage kits is that you can customize the size. If you already own a large basket, you could make a larger storage system than my version - even Ballard's! I myself wanted a smaller basket so that it would fit on our office bookshelves. To each his own. You can also use these file frames virtually anywhere they'll fit - desk drawers, dresser drawers, etc.
Has anyone else come up with a creative way to store files??!!! Do tell!
I am linking this how-to up with the following link parties:
I am linking this how-to up with the following link parties:
Monday: The DIY Showoff, Between Naps on the Front Porch, Skip to My Lou, The Girl Creative, House in Roses, Making the World Cuter, Keeping it Simple, Sumo’s Sweet Stuff, Twice Remembered, Super Stinky Boys, Mad in Crafts, and Creating Really Awesome Free Things.
Tuesday: Coastal Charm, Hope Studios, New Nostalgia, The Lettered Cottage, Trendy Treehouse, All Things Related, The Herber Family, Tip Junkie, The Gypsy Corner, and Creating a House of Grace.
Wednesday: Someday Crafts, Savvy Southern Style, Faded Charm Cottage, Fireflies and Jellybeans, The Thrifty Home, Blue Cricket Design, and Night Owl Crafting.
Gorgeous and affordable solution! I love it!
ReplyDeletegreat solutions! I love re-creating something expensive myself too. stop by sometime, domesticdeadline.blogspot.com
ReplyDeleteWhat a great idea. They turned out fabulous. I'm your newest follower. I would love it if you linked your project up to my link party.
ReplyDeleteMore The Merrier Monday.
http://diyhshp.blogspot.com
Good job. .. I love the stuff at Ballard. I want to give a try at making one of the cork boards one of these days.. just don't know where I would put it. Just joined your blog.. hope you will stop by my blog
ReplyDeleteWhat a great idea! I have a new linky party beginning on Thursday the 3rd, come over and link up your greatness. http://delightfulorder.blogspot.com/2011/02/delightfully-inspiring-thursday-linky.html
ReplyDeleteDaNita
they look great.
ReplyDeletexo,
sena
i'm soooo gonna go get a file frame now...thanks for the idea!
ReplyDeletewww.northerncottage.blogspot.com
I'm visiting from BNOP. These are fabulous!!!
ReplyDeleteI love these! What a great idea. I love the texture of the baskets and you'd never know what was inside.
ReplyDeleteThis is for sure going in the inspiration folder!
Best,
Ashleigh
Great solution for file storage! Thanks for sharing
ReplyDeleteTerrific - love the look and the practical usage - will have to check out Ballard for inspiration!
ReplyDeleteThank you for sharing,
Kathy
What a great idea!! Thanks for sharing!
ReplyDeleteYou are a genius. Honest. I have often wondered how to make the hanging files in my home office/dining room more attractive--it never even occurred to me to put them in baskets! (I have some in my metal file cabinets in the basement.) Thanks you for sharing! Great tutorial, too.
ReplyDeleteThank you ladies so much for your positive feedback!! Ya'll made my day :-)
ReplyDeleteVery nice. I enjoy using baskets to make my house look organized. I'll have to keep that in mind when we need more storage. Lot classier than the filing cabinet, and more portable too, especially for apartment dwellers like us!
ReplyDeletestorage and cute....love it!!
ReplyDeleteWow! That is SO clever! I would never have thought of doing that! :D
ReplyDeleteGreat idea on the cheap!!! ~~Sherry~~
ReplyDeletegreat knock-off solution for your file storage...love ballard, but love cheap ballard knock-offs even more...;) thanks for sharing with fridays unfolded!
ReplyDeleteblessings,
alison
stuff and nonsense
Oh my gosh this is perfect. So much better than the fileholders that I have and that I paid more money for. Thank you for sharing.
ReplyDeleteGreat idea, they look fab! Thanks for linking FLaunt it Friday! :)
ReplyDeleteWhat a fabulous idea! It gives me an excuse to buy more baskets! Thanks!
ReplyDeleteGreat idea for a great price! Thanks for visiting my site & I'm following now!
ReplyDelete-caroline
http://cwfrosting.blogspot.com
fantastic! I want that chair too... But not for that price!
ReplyDeleteThanks for linking up to Making It With Allie last week! I can't wait to see what you have for this week!
AllieMakes.Blogspot.com
Adorable.. I did something similar but added wood to the bottom inside of the basket and then wheels to the bottom. I then stack them with the one I use most on top...
ReplyDeleteGot to love the Ballard for inspiration!!
Maddie- the D.A.
I am seriously running down to Michael's TODAY! I have been looking at those baskets from Ballard's and trying to find comparables to make my own, with no luck. Here's hoping I can find those same baskets here! :) Found you through Centsational Girl's linky party. I also had a Ballard inspired project that I posted on yesterday, so yours caught my eye! Come say hi! I did a Ballard message board redo!
ReplyDeleteI love Ballard Design too. Awesome idea!
ReplyDeleteDIY storage baskets are easy to do and easy to find, plus it looks very pleasant and beautiful! I love what you’ve done and I hope I can allocate some time in making stuff like that. I’ve been very busy at work and I need to organize a lot of things, especially documents. I’ll be using these boxes by the time that I start sorting files.
ReplyDelete[ Ruby Badcoe ]