
My husband had only one request for his new office - a dry erase board. Now, the standard dry erase boards you see in classrooms and stores aren't the prettiest of wall hangings...not to mention, the larger varieties can get quite expensive - we're talking hundreds of dollars here:
 |
| Office Max |
So naturally the first thing I did was rack my DIY-lovin brain for ways that I could recreate a custom dry erase board that would not only make Mr. C happy and efficient while at work, but also enhance the overall look of the room I was envisioning. That's right, no off the rack dry erase boards would do for this home office.
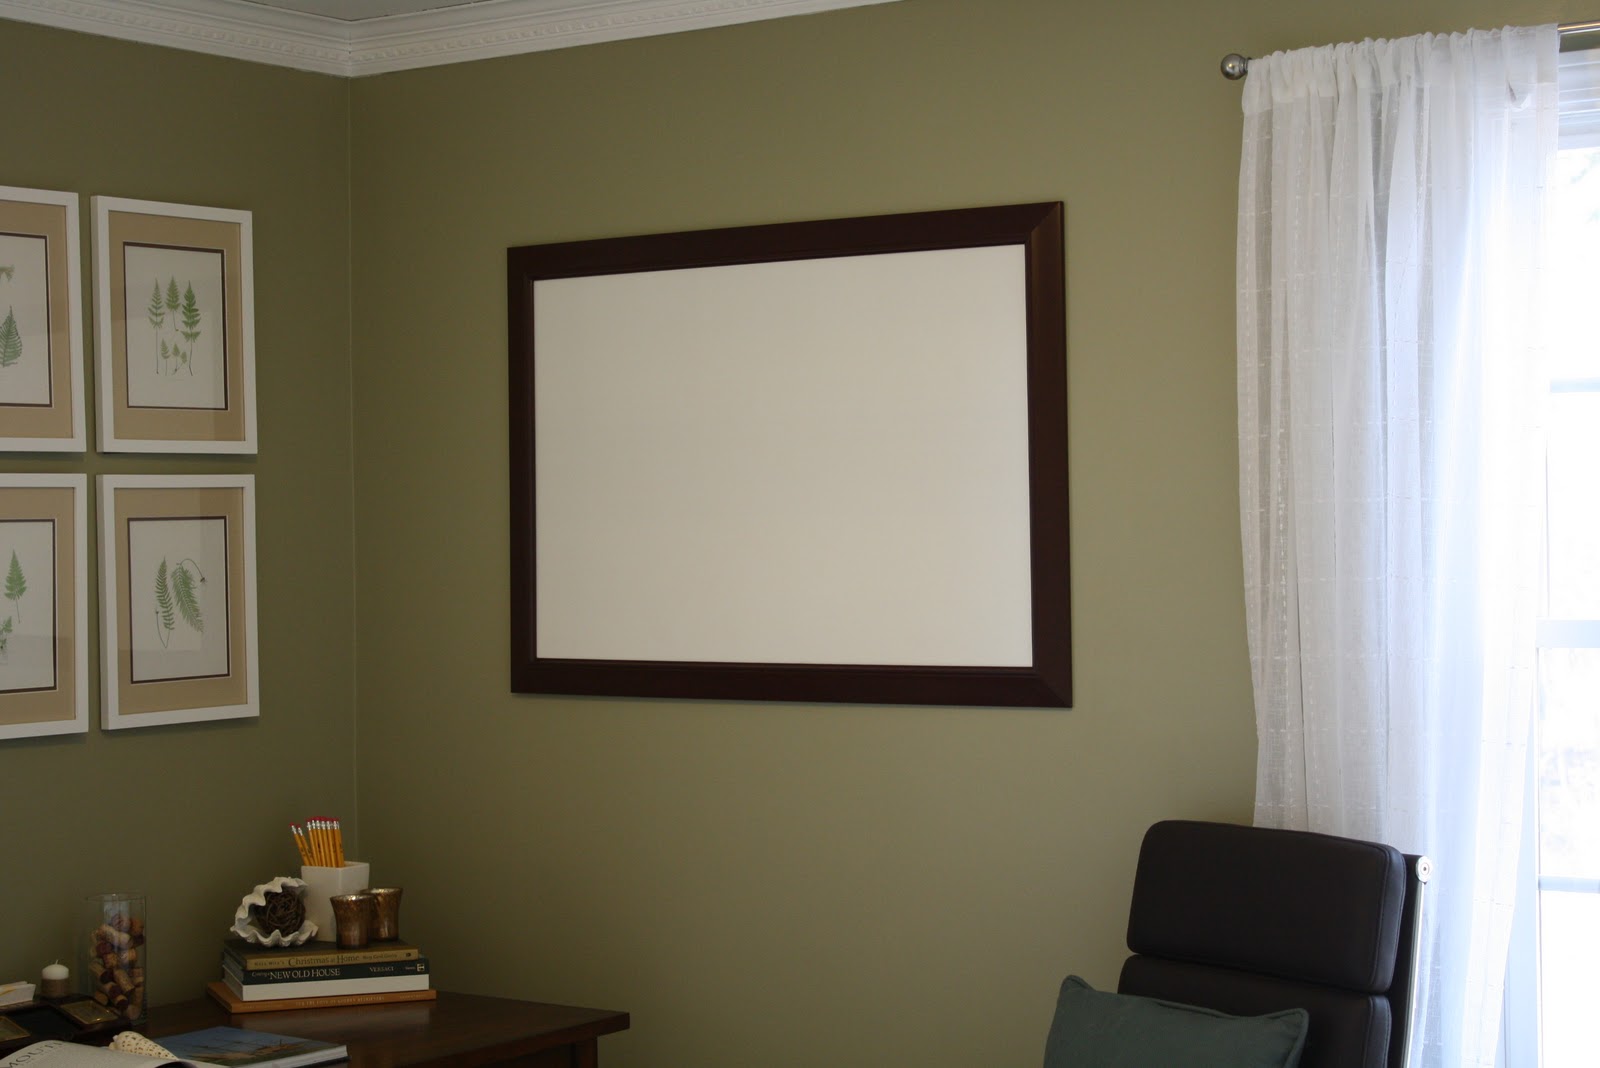
In my mind, I visualized a dry erase board with a rich wood trim that would provide some contrast to the whiteness of the dry erase board while also complimenting the wood tones of the desk. I wanted the frame to be subsantial in size and stained dark to play up the masculine feel for my manly man! :-)
Here's my dry erase vision come to life, along with a few preview shots of the office in progress:


Overall, this project was very easy to complete....although I tried several different options, Goldilocks style, along the way before settling on the perfect dry erase solution. Read on for the tutorial I used to create a $20 custom dry erase board.
How to Create a Custom $20 DIY dry erase board:
1) Buy a large frame intended for displaying posters. Walmart has a great, inexpensive selection; here is the 2x3' frame that set me back $5. (Original cost is $24.99, but I had a $20 gift card from a recent exchange):

2) Remove the cardboard backing, plexi-glass and anything else sandwiched in between these layers so you are left with just the empty frame.

3) Go to Home Depot and buy an $11 sheet of 8x4' white melamine board. Home Depot will cut it to size for you for free, so make sure you bring your frame's measurements (unless you can fit an 8x4' board in your car and feel like cutting it yourself). My frame was 2x3', so I asked them to cut my board to 2x3' and I had a ton of board leftover, which I brought home with me should the need ever arise for another dry erase board in our house. Here are the leftover boards chillin in our basement; the smaller size board is an identical 2x3' cut to the board I actually used, and there are actually two of the long boards leaning against the wall:

4) Wipe off any dust/dirt left on the boards from the cutting process. As you can see in picture above, they will be a bit dirty from the cutting, but all it takes is a wipe down or two with a rag to get the board looking white and pristine once again.
5) Frame your custom-sized melamine white board into your frame. Don't use the frame's cardboard or plexi-glass - you won't need it and it probably wouldn't fit anyway, with your new melamine board in place:

6) Hang your custom dry erase board and bask in its (and your) awesomeness:

A few important tips:
* When you go to Home Depot, make sure you ask for "melamine" - if you say you want "white board," or "dry erase board" they might not know what you're talking about, as this board isn't originally intended for this use (although it works like a charm, which brings up my second tip)...
* Don't be discouraged or alarmed if a well-intending Home Depot member tells you that you can't write on melamine. The person that did the board cutting for me thought I was crazy when I told him what I was doing and told me I flat out couldn't write on melamine. I kindly thanked him for the suggestion but told him I'd take my chances. As an elementary teacher, using inexpensive melamime board is a widely-used trick of the trade for creating inexpensive dry erase boards for use in the classroom. In my very first classroom, I went to Home Depot and had 32 mini dry erase boards cut out of melamine and they served my class and I well for over 5 years. However, this does bring my next tip, maitenance and caring for your melamine board....
* Make sure you erase your dry erase board after each use. A simple dry erase eraser will work fine, and you can find this (along with markers and dry erase spray cleaner in the office/school supply section of basically any store). Every so often, or if you notice the board is looking dirty, use the "Expo" dry erase cleaner - just spritz a spray or two of this ont a paper towel and wipe down your board. Very easy and will keep your board looking new for a loooong time. If you don't clean your board properly (and using fingers as erasers like a few fourth graders I know is not properly cleaned in case anyone was wondering), it will eventually start to get mucked up and leave behind faintly colored stains....again, something I learned from experience in my classroom.
*And now for my final tip which is another pearl of wisdom from my teacher days - if you accidentally write on your melamine (or any dry erase board, for that matter) with permament marker, simply write over the the permament marker with a dry erase marker, then use your dry erase eraser to wipe it off. I have no clue why or how this works, but it will remove the dry erase marker and permanent marker scribble.
Below are some other possibilities for creating a dry erase board; none of these worked for me, but you might have better luck. For each possibility, I've included why the project didn't work for me in hopes that you might have an ingenuis solution to my flubs. Good luck and let me know if any of these projects work for you!!!!
DIY Dry Erase Board Alternative #1:
1) For this version of the dry erase board, you will follow step #1 in my tutorial above.
2) After you've purchased your plexi-glass frame, keep the plexi glass attached to the frame but remove paper advertisement (you won't need it again) and also remove the cardboard backing (you will need this again so don't throw it out). The plexi-glass will be your writing surface. Jus like melamine, you can easily write and erase on plexi-glass (or glass for that matter):


I personally would prefer plexi-glass as it's not breakable and less expensive, but the choice is yours.
3) Spray paint your cardboard backing white (or any other color you prefer). Remember, this cardboard will be visible behind your see-through plexi-glass, so choose your color wisely. Black spray paint probably isn't a good idea, unless you have white dry erase markers....which I've never seen. A light color of spray paint is probably your best bet.
4) Once the cardboard dries, frame it behind the plexi-glass and you project is complete!
*Why this didn't work for me: While I normally love to spray paint, I was having a very hard time getting the paint to cover the cardboard. It was only a 2x3' board, yet it was taking an awful long time and a lot of paint to get it covered, as the picture below will show:

After awhile, I decided to jump ship and try out fabric (see the dry erase alternative #2)....
DIY Dry Erase Board Alternative #2:
1) Follow steps 1 and 2 of DIY Dry Erase Board Alternative #1.
2) Wrap the cardboard backing in a light colored wrapping paper. Choose a light color so that your writing will stand out against this background color:

3) Frame your wrapping paper-covered cardboard behind the plexi-glass and move on to your next DIY project.
*Why this didn't work for me: I used cheap, ugly wrapping paper because it was all I had on hand. The farther I progressed with this project the more wrinkly the wrapping paper got, and in the end, the project would have looked very DIY - and not in a good way.
DIY Dry Erase Board Alternative #3:
1) Follow steps 1 and 2 of DIY Dry Erase Board Alternative #1.
2) Wrap the cardboard backing in a light color fabric. Once again, keep in mind that this cardboard-covered fabric will be visible behind your see-through plexi-glass, so choose your fabric wisely. Fabric with busy patterns and/or fabric that is dark probably isn't a good idea, as it will be difficult for your writing to compete with busy patterns and/or dark colors.
3) Frame your fabric-covered cardboard behind the plexi-glass and hang that dry erase board on the wall somewhere!
*Why this didn't work for me: I didn't have enough fabric on hand. Once I got in the car and started driving to the fabric store, I turned back halfway because the more I thought about it, I realized that Mr. C would probably prefer "the real thing" when it comes to dry erase boards. I would have been fine with plexi-glass and fabric for a dry erase board....but I needed to think about Mr. C's preferences here, especially since it was to be hung in his office and this was the only item he really cared about. So with that in mind I headed off in the direction to get my melamine white board which I knew would help me create exacty what Mr. C was looking for. And PS - he LOVES this board....he said it's his favorite part of the office and I could totally go into business making this. What a guy!!
DIY Dry Erase Board Alternative #4:
1) Follow steps 1 and 2 of DIY Dry Erase Board Alternative #1.
2) Remove the cardboard backing and simply hang your framed plexi-glass. Keep in mind that your wall paint color will be the background color you write on....so choose your dry erase markers wisely to ensure they'll show up against your wall color.
*Why this didn't work for me: I actually didn't even try this - after the fabric mishap my mind was made up that melamine was the best choice for Mr. C....but I've included this as a viable possibility for others that might like this route.
I will be linking this tutorial up to the following parties this week - check 'em out!
Stay tuned for more office updates coming soon!!!
This is all my favorite things: functional and pretty! Thanks for the tutorial and tips!
ReplyDeleteVery nice! I just made a dry erase board too...under glass and using fabric...because I didn't want the 'whiteboard' look...but I like your idea for a custom whiteboard. I must admit, as soon as I read melamine I thought...no way! So glad you included your experience and tips to keep it looking great!
ReplyDeleteLoved the teacher tips! My pre-K students recently destroyed our mini chalk boards with crayons, so I was hoping to find inexpensive white boards somewhere to replace them with...thanks for all the tips!
ReplyDeleteThe work area looks fabulous! So glad you linked up on TJ, so I could find this awesome idea!
ReplyDeletethanks for the tip... I just bought a large dry erase board for our home office and my hubby and I had to find a place in the house that it wouldn't be easily seen... it really is a very utiliatarian looking thing!
ReplyDeleteFunny! The guy at the home store we went to years ago insisted the same thing! A little trick I learned eons ago working for an optometrist: Alcohol takes permanent and non permanent marker off of EVERYTHING. And if you look on the ingredients in those cleaners, the active ingrecient is alcohol. Anyways, Great job!
ReplyDeleteThanks for linking up to Making It With Allie! I can't wait to see what you have for next week!
AllieMakes.Blogspot.com
I love that pillow on the chair.
ReplyDeletelisa