This tutorial is going to focus on recreating more natural-inspired Easter decor, like these pretty and realistic eggs on our kitchen table:
There are quite a few tutorials in blogland right now for very similar versions of this DIY project; however, I figured I'd share my version, too. I seem to be on a roll with this Easter egg decor (which makes me happy, since up until this point I owned zero Easter/Spring-y decor.....I am all about Christmas and Fall decor).
So here's the how-to:
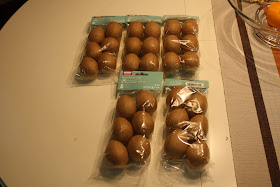
1) Get some eggs (real or faux - mine are paper mache purchased for $2.50 for a pack of 6 at Michael's...I wanted to go the faux route so I could save these for future years):
2) Paint your eggs. I chose Krylon's "Peekaboo Blue" spray paint, which you can see in the back right corner of my Easter paint collection here:
3) Once your eggs are dry, it is time to add the speckled paint. To do this in Martha Stewart fashion, which is what I did, mix brown acrylic paint with a bit of water. Then, find an old cardboard box and put it inside your sink (or outside if you think you'll be messy) and dip your paint brush into your watered down paint. Get a good amount of the paint on your brush, then tap hard on the sides of the cardboard box. Paint will splatter off of the brush onto the bottom of the cardboard box, as shown in the picture below. Take your eggs and gently roll them on top of the splattered paint. *Note - you will need to re-splatter the paint from your brush a handful of times to ensure you have enough paint for your eggs....so keep the brush and paint nearby.
4) Let your eggs dry. I used another Martha pearl of wisdom and created a makeshift drying rack by using a strip of styrofoam and push pins. Each egg is resting on four pushpins.
Overall, this was an easy tutorial and Mr. C. ending up loving this Easter decor best of all...I'm pretty happy with the end result, too.
I hope everyone has a great week and if you haven't already entered my first ever giveaway for a beautiful, custom, ceramic house number sign be sure to do so! Winners will be announced tomorrow!!!
I will be sharing this post at the following parties this week - stop by and check out some great ideas generously shared by many other fearless, fabulous DIY bloggers out there!
I will be sharing this post at the following parties this week - stop by and check out some great ideas generously shared by many other fearless, fabulous DIY bloggers out there!


Fabulous!!! great tutorial!
ReplyDeleteI love the look of these eggs! I just made some Robin Egg sugar cookies just like this! I am going to have to do this!
ReplyDeletewww.simplycadence.blogspot.com
These eggs are beautiful!!
ReplyDeleteThat's so cool! I love it! I'm going to check out the post on the white eggs, too. Genius.
ReplyDeleteAwesome! Thanks for linking up to Mad Skills Monday!
ReplyDeleteThese are beautiful eggs.
ReplyDeletelisa