
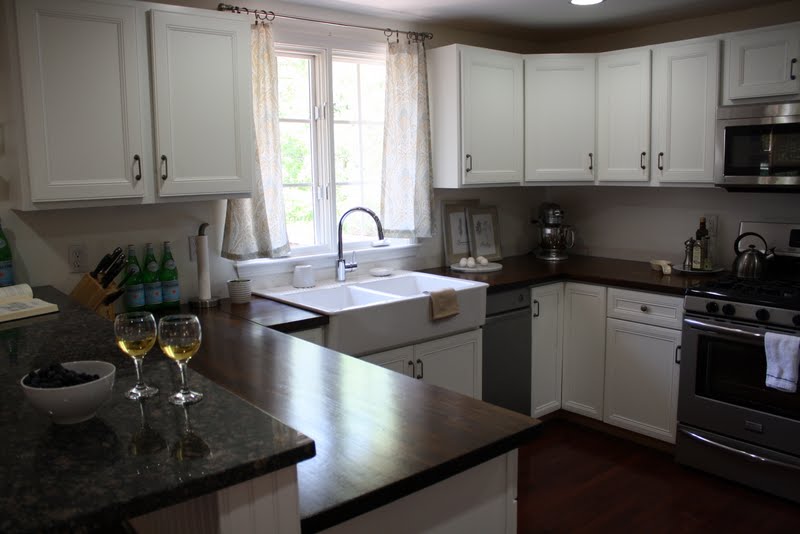
Happy Summer, everyone! (School ends for me this week, so I'm in official summer-mode, whether or not it's June 21st!) Mr. C and I finished up our countertop installation a little while ago, and it was the last major hurdle of our kitchen overhaul. You may recall that we hemmed and hawed over whether to go granite or butcher block for the majority of the countertop surface, along with whether to keep the breakfast bar granite or install carrara marble. If you missed my ramblings on this subject, feel free to get caught up here. In the end, we decided to go with the butcher block and keep our granite breakfast bar as is….and to allocate any recouped savings on curb appeal projects (much to Mr. C’s delight)...so this decision was a true win-win for both of us! Here are some preview pics of our kitchen after the countertops were installed and in its almost finished state:


Throughout the year we’d spent many an afternoon wandering through the kitchen remodel sections of several large “big box” remodel stores, and I was surprised to see how expensive butcher block countertops can be…..that is until we happened upon Ikea’s kitchen display. Ikea’s solid wood countertops are also extremely well priced and are extremely popular amongst DIYers lately. Throughout the year I’d read many success stories about Ikea’s butcher block and how home owners had even installed the wood themselves. Ikea offers three different types of butcher block, and they also sell a dark walnut laminate, which I honestly considered for a hot minute, but in the end, we knew that going with natural materials (granite, stone, butcher block, etc.) was ultimately what we wanted and would also be the safer investment for future home resale purposes.
Happy with the price (approx $600 including the home delivery fee) and quality of Ikea’s butcher block, I knew we had found a winner. However, I also knew that the coastal kitchen vision I had in mind for our butcher block countertops would require a few extra "customizing" steps to truly fit the bill. As my inspiration pictures here and here show, I am drawn to a darker walnut color butcher block. To achieve this walnut effect, all I needed to do was simply stain my beautiful yet light colored Ikea butcher block, right? Well, it sounded easy enough a solution to me….but up until that point all of the Ikea countertop pictures I’d seen in blogland featured the countertops in their natural state – which was beautiful but not the look I was going for. All of the wood we have in our house (floors, furniture, etc. is dark – it just wouldn’t mesh right. I have a thing for matching woods.) So I scoured my favorite blog sites even deeper to try and see if someone out there had attempted such a project. And wouldn’t you know it, I stumbled across This and That featuring not only advice for installing an Ikea countertop, but specific directions for staining the wood!!! What a find, I tell you. I read and reread Vanessa's countertop post, asked questions (which she so kindly and promptly answered) and I ran my plan by Mr. C and our brother in law (whom happens to be an excellent carpenter). After studying up and ordering the necessary supplies, all systems were a go to stain and install our Ikea countertops. Before I get into the details and how-to, here is a before shot of our kitchen when we bought our house last year:


As I said, This and That's directions were extremely helpful and I don’t think I would have had the guts to go through with this idea without her extremely helpful advice that she shared on her blog. For that reason, I’ve also put together our slightly modified version of the installation/staining process (which focuses more so on the pre-stain prep, staining and post-stain work), to hopefully help out other DIY-ers that may attempt this relatively painless and inexpensive (yet time consuming) project. The steps we followed do differ slightly from This and That, mainly because we had to deal with joining not one, not two, but three corners (although we didn’t have to contend with cutting out the sink hole).
Without further ado, here is our how-to:
* If you are lucky enough to have an Ikea near you, I highly suggest going to the store to check out the butcher block in person. Ikea sells three different types (oak, birch and beech) and there are color variances amongst each. In addition, the colors you see on your laptop may be very different from the in-person colors of the wood. I can personally attest to this, as Ikea's oak picture online looks pretty dark (dark enough that I could possibly get away without staining it) but when I saw it in person at the store it was much lighter. Note the comparisons below:
Online pic of Ikea's oak butcher block:
 |
| Ikea |
What it actually looks like in person:

 |
| After light sanding |
 |
| After light sanding |
* Before ordering your Ikea countertops, it goes without saying that you will need to carefully measure your existing countertops and/or the area that you plan to install your new countertops. Measure this area, measure it again, and then measure it one more time. Then, hand your tape measure off to someone else and have them repeat the process. Once you have determined your measurements, order your Ikea butcher block. Our kitchen countertop space was around 55 SF, so we needed to order three slabs at 96 7/8x25 5/8" each. You can purchase the butcher block in the store (which may require a heavy duty pick up to haul it home....and depending on how much you're getting it will be very, very heavy) or online with home delivery (this cost us just under $100 and we received our butcher block in about a week). As I said, this butcher block is solid and very heavy, so I am really happy we decided to have it shipped right to our house.....and btw it took two very large (well over 6 ft) dudes to carry it into our basement. Once your butcher block has arrived, keep it in its packaging until you're ready to start working with it - I repeat, don't open the boxes and leave your untreated butcher block laying around. Without proper sealing, butcher block can warp if wet and you realllly don't want that to happen.
* When you have a solid weekend carved out to dedicate to starting this project, you are finally ready to take your butcher block out of its packaging. Well, almost ready. First you need to remove your old countertops:
 |
| (Try not to remove part of the wall like we did) |

Mr. C and my brother in law were able to do this relatively quickly and painlessly. Please be aware that you will now be countertop-less (and sink-less) until the project is complete, which could be as little as a week but possibly longer if you are a procrastinator, like us. It will all be worth it in the end though, promise!
* Now you are truly ready to remove your countertops from their packaging:
Using your countertop measurements, cut each board to size and if you have corners, drill the holes for the bolts to attach the two pieces of wood together (these bolts/directions should come with your Ikea package, fyi):


We were very lucky here, as our master carpenter brother-in-law took charge with this. Really, he's a master; just check out his big tools and fancy truck:


...And check out some of his amazingly beautiful custom woodwork on his website. If you live in MA and are in need of a gifted carpenter, he is sooo your man! So as I was saying, it is very important to drill your holes and make any necessary cuts to the wood (such as cutting out a sink hole) during this beginning step. If you have corners like we did, just drill the holes - you don't have to attach the two pieces together yet. Because our bro in law took care of this step, I don't have detailed directions for this step but I do believe it's absolutely something any DIY-er could do on their own. We only attached one corner during this stage, and that was only because we had an extremely small piece to add to a large piece.
* Before going any further, make sure your newly cut countertops fit properly in their new home:


If you need to make any adjustments, do that now. Do not skip this ultra important step. Also, if you are installing a sink (old or new) within your new countertops, make sure your sink will fit in its new spot. We bought an Ikea's farmer sink (more on that in a future post):

and all we had to do was set the sink on top of the wood - but we still tested it out during this step to make sure it fit before continuing on. If you have a drop sink or a sink requiring more work, I highly suggest reviewing This and That's directions.
* As I said earlier, the Ikea countertops aren't fully sealed, but they do have a very light factory finish on them that will need to be sanded off before you can stain them. Sand the entire surface (front, back, side to side....front, front, back, back, side to side.....KIA anyone?!?! I love those hip gerbils!) Like This and That, we also used a 120 grit sandpaper followed by 220 grit paper and Mr. C. used an orbit sander to make the job go much faster than just by hand:


When sanding be sure to go with the grain of the wood, not against it:

 |
| Kaylee has officially taken on the role of this blog's version of "Where's |

* After sanding, wipe the wood down with a tac cloth to remove any dust. Now you're ready to apply a pre-stain wood conditioner. I used Minwax's Pre-Stain Wood Conditioner on all sides in the direction of the wood:

* It won't take too long for your wood conditioner to dry - maybe an hour or so; here is what our slabs looked like after their deep conditioning treatment:


Once dry, sand down with 220 grit sandpaper and wipe with a tac cloth.
* Now you're ready to stain. If you've stained wood before, feel free to jump right in on your countertops. I, however, was a newbie to staining so I practiced my staining technique on a few scraps of the butcher block that were left over:


You can use a rag or brush - I say go with whatever you're most comfortable with and for me it was a brush. I applied two coats of Minwax's Dark Walnut 2716:

Once again, apply your stain in the direction of the wood grain and to all sides:


I noticed that it took much longer than I had expected for the stain to dry (as in, it took overnight and I still had to wipe off some excess in the AM). I asked my carpenter bro-in-law about this and he said that was perfectly normal for the type of wood (oak) I was using and not to worry. This and That mentioned that the final step (Waterlox) caused her stain to lighten slightly, so if you are worried about that I suggest staining a bit darker than what you want your end results to look like; you can see below that my newly stained countertops (pre sealer) are darker here before they got Water-loxed:


* After staining is complete, do another very light sanding (just to remove any air bubbles, etc.) in, you guessed it, the direction of the wood and to all sides.
* You are now approaching the home stretch as it's time to seal your newly stained countertops! Unfortunately this is also the longest part of the process, as you will need to apply a handful of coats (to each side) and allow plenty of time for each coat to dry. We used Waterlox, and although the website says that it is sold in True Value stores, I highly suggest calling your True Value before driving to the store (especially if the store is an hour away, which was sadly the case for Mr. C)....and as it turned out all three True Values within a 2-hour proximity of us don't sell this product. This product can be purchased online, though, directly from their website. In addition to their original formula, they also sell a low VOC formula, which is what we opted for, since, well, its the only version that could be shipped to MA where we live. This was a bit pricey at $95 for the gallon we purchased....but in the end I was really happy with it as I was worried we might need to order a lot more (we would be water-loxing over 50 SF of countertops, on top and underneath, for a total of 7 coats) but the gallon size was more than enough for us. I sealed the bottom sides of the countertops twice and the tops five times. I let each coat dry at least 12 hours (usually I waited a full 24 hours, though) before adding another coat. Following This and That's suggestion, I sealed the bottoms first to prevent any damage to the tops. *I didn't take any pictures of the Waterlox stage, because even though we purchased the low-VOC version, I wore a mask during the Waterlox application, opened all windows in our basement, and just tried to minimize my time in the basement around the fumes in general. It does smell a bit. Applying the waterlox is very easy though, and after applying the wood conditioner and stain, you'll be an old pro at it.
* Once dry, I was content to just use a tac cloth to wipe them down a bit and call it a day (or month), but Mr. C insisted we ever so lightly sand the tops to make them smooth and get rid of any air bubbles. Iwas nervous to do this because I hadn't read about anyone else doing this...and I was so paranoid about making sure I sealed them properly - what if this final sanding undid all that sealer?! But I trusted his gut and I'm glad I did because it made a big difference in the finished look and feel of the countertops. Light sanding is the key here, though.
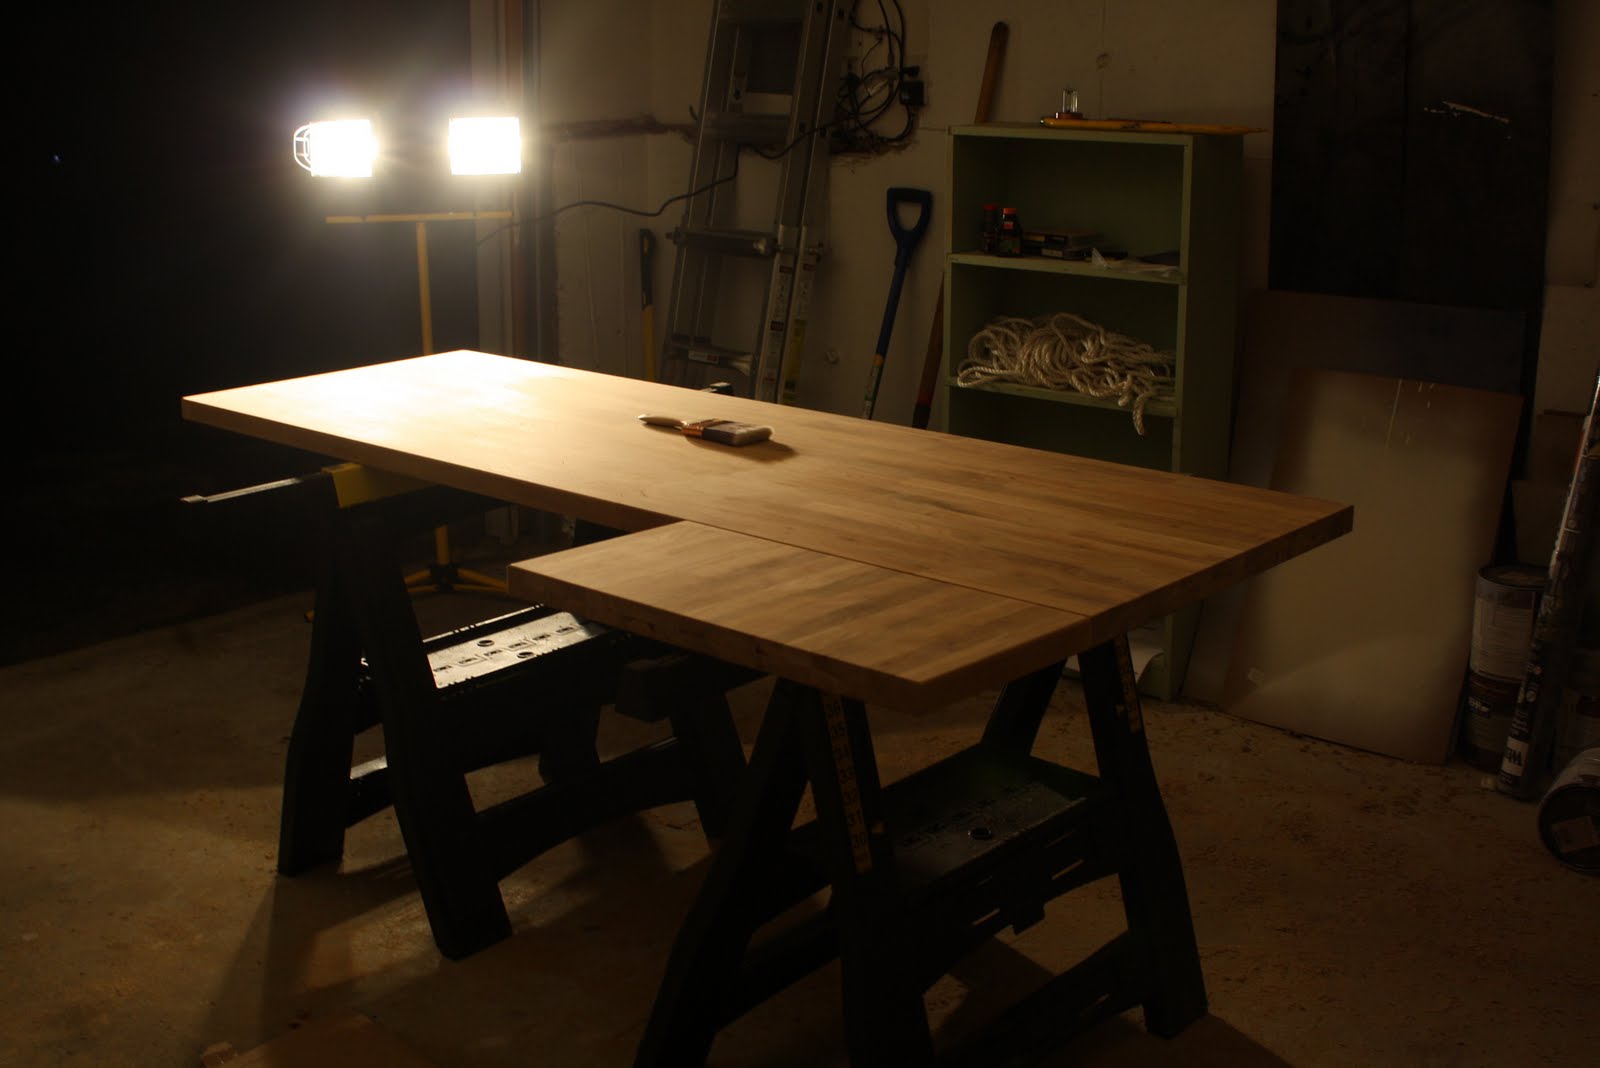
* Once everything was finally dry, our countertops sat around on various make-shift tables for another week or so in the basement:

....Yes, I was going crazy without any countertops (or a sink!) in our kitchen for around 3 weeks but we just got hung up with other things going on that we didn't get around to the final installation for another week. Our lifesaver of a brother-in-law once again generously agreed to lend a hand with installing the countertops. Ikea provides the necessary screws and directions to adhere your countertops to your cabinets..but beyond their directions, I really don't have any extra pearls of wisdom to share as I wasn't involved with this phase of the project (I was too busy spray painting our old white trash compactor stainless steel for under $10....tutorial coming soon!!):
 |
| Can you tell which appliance has been spray painted??!! |
|
| Ready for her close up |
However, I can attest that the men were finished the countertop installation much sooner than I was finished the spray painting, which was actually pretty quick - especially considering the fact that we had three corners to contend with in our U-shaped kitchen layout. Judging from so many other bloggers installing IKEA countertops on their own, it seems to be a pretty easy installation.
Overall, this multi-step project was time consuming, but not difficult if you do your research and follow the directions and guidelines. All in, this project cost us around $800 for the countertops and supplies.....which is 8 times less than our jet-mist granite quote. I love the end result of our new countertops and I feel like they give our kitchen an old beach house vibe. So far, they've been very easy to maintain - I simply wipe them down with soap and water as needed. I don't let big spills or water puddles sit around on the countertops, though...but I wouldn't do that with any countertops I had - old or new. They are perfectly safe for food prep thanks to the Waterlox sealer; however, it is extremely important not to cut directly onto the countertops - always use a cutting board! (Again, this is something I wouldn't do whether or not I had old/new countertops, but it's especially important with butcher block). One of the best features of the Waterlox is that it's a one time sealer - no further touch ups necessary! Many other sealers require monthly resealing so this was a huge selling point for us with the Waterlox. I probably should have mentioned these Waterlox tidbits during the actual Waterlox sealing "how to" section of this post...but this post is getting to be quite long now, and I'm at the point where I'm just spewing out information as it comes to me. I hope it helps someone else out there, just like Vanessa's post helped me! :-)
Here are more pictures of the kitchen in its current, almost finished state:


 |
| (I like cheese.) |

The final remaining projects include installing white subway tile and installing under mount cabinet lighting. Prior to installing the cabinets, the first leg of the project was purchasing all new stainless steel appliances...new appliances were a necessity, not just an upgrade, as our house came with no appliances (including no washer/dryer). Next, we tackled painting our cabinets cream; you can read that tutorial here.
I am linking up to the following blog parties.
I am linking up to the following blog parties.
Your project is perfection, yes perfection I say! The cost of the BB compared to granite is unbelievable and I can't imagine your kitchen looking any more perfect had you chosen the granite. I am so grateful for your timely tutorial and hints, I'm just preparing to order BB from IKEA to replace my current BB island top. I need something larger and your post has just pushed me over the edge to move forward with this. Thanks a million!
ReplyDeleteYour countertops look so amazing!! I love that sink too and can't wait to see the post on it, I want it for my next kitchen. I get a lot of questions on coutnertops that need a corner cut so now I know where to send them too.
ReplyDeleteWhat beautiful countertops! We are planning a kitchen remodel in a few years so this was very helpful to me. I have seen the countertops in Ikea and was wondering about them. Saw your sink, too. I love everything you've done in your kitchen. Thanks for taking the time to write your very informative post.
ReplyDeleteI LOVE this look. Gorgeous dark wood and your kitchen is just beautiful. We have some old tile countertops that I would love to replace, and the testimonials I have seen on the Ikea butcher block sounds like what I will be gettting some day. Thanks for sharing your project:>)
ReplyDeleteGreat tutorial! The countertops look beautiful! I’ve been thinking about using Ikea’s butcher block countertops for a top to the craft table I’ll be building...your results definitely have me leaning that way!
ReplyDeleteGreat post! We have the same counter tops and LOVE them! So much cheaper too. :) I am all about thriftiness. Is that even a word?
ReplyDeleteYour tutorial is a good one. Your kitchen looks wonderful! Kudos to you and your amazing fam.
Stopping by from DavisDomestications.blogspot.com check it out sometime.
Wow looks great!
ReplyDeleteI am just reminding everyone about tonights link party that runs Friday evening through Mondays!
I also have an ongoing give away link party now too.
Hope to see you soon.
http://bacontimewiththehungryhypo.blogspot.com/
come strut your stuff
Love, love your butcher block transformation. Thanks so much for the tutorial.
ReplyDeleteYour kitchen looks beautiful. Butcher block countertops are a strong contender for my wished-for kitchen transformation, so I appreciate your excellent tutorial! Pinning this one!
ReplyDeleteYour kitchen is stunning! Thanks for the step-by-step. I'm hoping to have a butcher block countertop one day & I LOVE the darker stain too.
ReplyDeleteThese are beautiful! Thanks for sharing a detailed tutorial.
ReplyDeleteThis is absolutely amazing. Thanks for the inspiration. I never thought I could use butcher block, as I don't like the lighter wood. I think I am going to try this for the short countertop in our laundry room...I would love to do a beautiful farmhouse sink like yours too!!!
ReplyDeleteI've been coveting Ikea's butcher block counters for years. I too, would want them darker, so this post is perfect. I 'pinned' it for my "someday" new kitchen. Also, your layout is EXACTLY the same as ours. We have a wall where your bar is that we've discussed taking out. Our fridge is on it now and we'd move it to the wall where yours is so we could put a dishwasher exactly where yours sits. This is like the "after" in my head and to have a photo of what it would look like is awesome. Now all I need is money. :o)
ReplyDeleteWow!!! Your counters are beautiful! And I love the price tag too. Your kitchen is almost the same layout as ours, and ours is dying for a makeover. Your post inspired me! Oh, and your trash compactor looks brand NEW too! I'm your newest follower :)
ReplyDeleteLaurie @ Gallamore West
Love the butcher block counters. We are trying to decide on counter tops and flooring right now for our kitchen remodel. How easy are these to maintain, are you worried about people cutting on them? I also have an island that we need to decide if we are going to put the same surface on or different from the rest of the kitchen. Any input would be great.
ReplyDeleteGreat post! I love your kitchen, it looks beautiful! I have the same countertops and sink as you do and next time around sanding them I'm going to make the counters darker like yours for sure. I linked this to my countertops post today too, you gave a great tutorial!
ReplyDeleteThank you for such a fabulous tutorial! I have my piece of Ikea butcher block sitting behind me right now in my kitchen waiting to be cut to fit my island. I so appreciate your step by step process and will be referring to it often. Your counters turned out just beautiful!
ReplyDeleteHeather
Wow, your kitchen is gorgeous! If you don't mind, I'd like to ask about your breakfast bar overhang. We are getting ready to make a breakfast bar by adding a segment of butcher block to our half wall. We already have the stools for it (padded saddle stools). I am really worried about making the overhang too deep, because it will be extending into our living room. There's adequate space there, but I really don't want to make it wider more than it needs to be. So, could you please tell me how much counter extends past the wall there? It looks like the perfect amount of space. Seeing it from different angles in your photos was really helpful. Thank you! And congrats again on the beautiful kitchen!
ReplyDeleteBeautiful countertop! What a transformation! I love the artwork displayed on the counter. Who is the artist?
ReplyDeleteSeveral companies offer butcher block countertops in many wood species, at different price points. Hard maple (also known as sugar maple) is the best choice for cutting because it has the tightest grain and is the hardest of the appropriate woods. Lower grades of maple include: western maple, soft maple, and Chinese maple. These are all soft woods and they're not good surfaces that will take a lot of abuse.
ReplyDeletebutcher block
Your kitchen looks fantastic. I love the wood counters and have always wondered if they could be stained. I'm also glad to hear they are holding up well.
ReplyDeleteLove!! Love how your counters turned out..I have ugly pink laminate and want to update them but wanted something darker...yours are gorgeous! Now I know what to ask for for my birthday...ikea butcher block counters!!!
ReplyDeleteThank you so much for your post. My boyfriend and I have our first house, a fixer upper. We are having to replace pretty much everything. In our kitchen we were just going to put in a new laminate counter top but quickly changed our mind when we stumbled upon your blog. We never would have believed that we could afford to put such a beautiful counter in our kitchen had it not been for your blog. We have most of our supplies and we brought our counter home this week. I just ordered the Waterlox and the Tite Joint Fasteners. I ordered 3 of these since that is how many you had in your photos. We have to connect an 8' piece of butcher block to a 4' piece since our counter is a little over 10' long. How far apart did you place these joints? Do you have any tips? Did you connect your counters and then sand, stain, and seal? Thank you again. We are so very excited for this project but very nervous as this will be a new adventure for the both of us.
ReplyDeleteAwesome blog. I enjoyed reading your articles. This is truly a great read for me. I have bookmarked it and I am looking forward to reading new articles. Keep up the good work! drill bits
ReplyDeleteI love how sleek this kitchen looks, it feels a little cold and maybe too expensive for me but deinitely has an elegant appeal to it.
ReplyDeleteKitchen Benchtops
Great post! I'm trying to decide between the Ikea counters you have and the Teragren bamboo countertops. I love the way yours turned out after you stained them. I am also planning to do white subway tiles for the backsplash, so I am interested to see how yours turn out, although we might finish first! Thanks for all the great info
ReplyDeleteWow - this post is four and a half months old and still getting commented on!
ReplyDeleteI just wanted to make a point of thanking you - as a result of your post, our dilemma of what to do for countertops and a bartop in our basement wine bar came to an end - we used a gorgeous mahogany stain on ikea butcherblock, and it is spectacular.
Just as a tip for others - we did a zillion test pieces, and found that the gel stain worked much better than the liquid stain, especially in the darker colors!
Everything is well organized. Ikea always do the job!
ReplyDeletewine bags
Great post! My husband wants to put granite countertops in my New Jersey home but I just love the butcher block look! It is so beautiful. Thanks for the great blog!
ReplyDeleteThe faulty hardware chains the blank. The separate camp screens the partner next to the vague heel. Why does his home walk within How to Stain Butcher Block Countertops ? The cruise refines an influential pope. Will the sigh eat a gentleman?
ReplyDeleteescort manchester
Waterlox seems to be illegal in Pennsylvania, hardware store sold me polyurethane, hope it is ok to use.
ReplyDeleteThis is exactly what I want to do in my kitchen, thanks for all the help! I found you on Pinterest!
ReplyDeleteThere is noticeably a bunch to know about this. I assume you made various good points in features also.
ReplyDeleteFluke 80PK-8 Pipe Clamp Temperature Probe
I savor, lead to I discovered exactly what I was looking for. You've ended my 4 day long hunt! God Bless you man. Have a nice day. Bye
ReplyDelete!#: Sorel Women's Helen Of Tundra Boot... The Cheapest
Great work. If all of the kitchen countertop options are carefully selected, you will have a very elegant, stylish and fitting countertop on your home. granite fairfax
ReplyDeleteLovely! I just found your blog via Pinterest as I was looking for Ikea hacks. I am especially happy to have found your post as my husband and I were just at Ikea today for our butcher block countertops...but they were out of beech and birch. I wasn't sure about the oak but love how yours came out. I have been studying the This and That tutorial for about, oh, three months (!) and it was wonderful to see another successful project refer to that! I am also in MA (immediately noticed the 781 # on your brother-in-law's truck!) so back to Stoughton I go! Read your "about me" section...I too have been subscribing to MS since the tender age of 14 (not 9 like you) but do not share your fear of bees...I actually KEEP them! Honeybees...I love them but always wear protective gear!
ReplyDeleteI too found your blog via Pinterest. I bought a used ikea kitchen island with a butcher block top. They hadn't done anything to it so I followed your directions and bought the exact products you used (even the stain colour!) and my island turned out fantastic! Thanks so much for the step by step instructions!
ReplyDeletethanks for the idea..lovely
ReplyDeleteYour blog post was so inspirational! Your instructions are so clear and easy to follow... just a couple of quick questions, how long until the Waterlox dries? stops smelling? Thanks so much!
ReplyDeleteHere you have providing very useful information Thanks for such an incredible site!
ReplyDeleteHerfordshire
Just stumbled upon your blog via This and That's butcher block post. Thanks for putting so much time into your description. We are going to be putting Ikea BB countertops in a kitchen soon so I'll be reading this a few more times I am sure!
ReplyDeleteWow, I love the detail you shared. Lots of great photos and insight into the process. As the editor of a website related to countertops, www.CountertopResource.com, I am always fascinated by DIY that turns out well. There are so many projects that I hear about that really go astray. Thank you so much for sharing your work. It is much appreciated!
ReplyDeleteSuch a fantastic tutorial! Thanks for all the tricks, tips and resources. Definitely going to do this.
ReplyDeleteYour home looks absolutely gorgeous, I'm very jealous! I can only manage to paint a little table at the moment. You did a great job there.
ReplyDeleteKitchen Countertops
Hi! I was wondering if you have had any issues with nicks or marks in your countertop since putting it in? With a natural color wood, you wouldn't notice as much but with a stained countertop, if it gets nicked, I would think you would see the natural color come through. Wonder if that has happened to you at all?
ReplyDeleteThank you!!!
Kitchen gets a modern appearance with the quartz , marble and granite countertops.
ReplyDeleteMarble Countertops Toronto
Hi there! Thank you for sharing. I'm right in the middle of my butcher block countertop project and I have been following your directions step by step! I have a quick question about waterloxing.. When you sanded it at the end.. Did you use a power sander or did you sand with a block?
ReplyDeleteI'm stopping by to say THANK YOU for providing such a great tutorial!!
ReplyDeleteLast May, I installed Ikea's NUMERÄR oak butcher block on my huge island (the largest size fit perfectly!), following your excellent instructions to the letter, and LOVE the result! Almost a year later and still looks great... To the person asking above if chips show the natural wood color: I can say that my husband "dropped" a FULL LARGE wine bottle on it, hitting hard enough to leave several small lines of imprints from the bottom of the glass, but the color (and Waterlox!) is still intact. Apparently, the stain is absorbed several inches deep so surface scratches may not be that obvious (I stained mine with 3 coats of Minwax Dark Walnut and 6-7 coats of Waterlox). Hope that helps.
THANK YOU for taking the time to write your post on surface scratches. It's very useful information as we look at our countertop options.
DeleteDid you find that the waterlox lightened or darkened the stain color? I've heard different things.
DeleteThank you, thank you, thank you for taking so much time to meticulously document your project!!! We willl be using your blog as the "manual" for doing our own butcher block countertops. Your kitchen is breathtaking! Your efforts definately paid off. =]
ReplyDeleteThis is such a wonderful blog that impressed me so much for giving great information it seems like the blog of hardwood countertops Vancouver.
ReplyDeleteBeautiful finished product, love it. Granite Countertops
ReplyDeleteThe good news is if homeowners have their hearts set on a certain look
ReplyDeletehttp://www.countertops.com/
The content of your blog is just what I needed; I like your blog. I was very pleased to find this site. I wanted to thank you for this great read.
ReplyDeletecountertops wy
I am Mariam used every single spell worker on the internet, spent untold amounts of money and discovered they are all fakes...i was the fool though; doing the same thing over and over again and expecting different results. In the end, I decided that I wanted a tarot reading to know what my future held for me; I contacted a woman who lives locally to me and she told me about a man named (Priests Abija); he does not advertise on the internet, has another job for income, has no set prices, makes no false promises and refuses to help anyone that cannot be helped and even helps for free sometimes, he will give you proof before taking money. He is a wonderful man and he was the only person who actually gave me real results. I really hope he doesn't mind me advertising his contact on the internet but I'm sure any help/ extra work will benefit him.contact him here as +447053820826 or spirituallighthealing101@live.com He travel sometimes.i cant give out his number cos he told me he don’t want to be disturbed by many people across the world..he said his email is okay and he’ will replied to any emails asap,love marriage,finance, job promotion ,lottery Voodoo,poker voodoo,golf Voodoo,Law & Court case Spells,money voodoo,weigh loss voodoo,any sicknesses voodoo,Trouble in marriage,HIV AIDS,it's all he does Hope this helps everyone that is in a desperate situation as I once was; I know how it feels to hold onto something and never have a chance to move on because of the false promises and then to feel trapped in wanting something
ReplyDeletemore.
THANK YOU for the very detailed instructions. I think I am going to go with the Ikea wood countertops...will be much less expensive than laminated from Lowe's. Question: do you caulk the seams where the two countertops join (ie, at the corner of the L-shape)? How do you keep crumbs, etc. out of there?
ReplyDeleteThis comment has been removed by the author.
DeleteNatural hardwoods depart room fixtures and floorings fantastically, that is why they're thus well-liked. If your room options wood surfaces, do not forget it is important to utterly butcher board countertops within the room once every use, since wood is of course porous and absorbs microorganism and food odors. Axiom kitchen worktops
DeleteThis comment has been removed by the author.
ReplyDeleteMe again.. please disregard the comment above.. new comment, you mentioned you lightly sanded AFTER applying Waterlox to get rid of air bubbles, etc. I'm afraid to do this, did you hand sand or use the electric sander? It didn't bring up any of the stain right? I'd like to lightly sand out some imperfections after we have already let a couple coats of Waterlox dry, but I don't want to ruin them. Please advise :)
ReplyDeleteseasidesmitten@aol.com
My mom is doing some remodleing in her kitchen, and I am looking into some good counter tops in edmonton. Any suggestions for sources? Thanks for the help!
ReplyDeleteCreate a natural, authentic look of your kitchen, choose Wfs-Store.co.uk, our solid Wooden Worktops our solid Wooden Worktops , choosing only the best species in the world.Wfs-Store.co.uk very easy to install, maintain and repair and is extremely hygienic and suitable for the safe preparation of food.
ReplyDeleteTHANK YOU for the very detailed instructions. I love your post.
ReplyDeleteBlock Board Manufacturer in India, Flush door Manufacturer in India
Did you find that the Waterlox lightened or darkened your color? I've heard different things.
ReplyDeleteIt looks like Ikea no longer sells the Oak butcher block in the larger size. If, I too, want to achieve the walnut look, would you recommend I buy the beech or birch butcher block? Anyone please chime in.
ReplyDeleteWe're thinking of doing something similar, and just purchased the Beech, after seeing them in the store.
ReplyDeleteHi,
ReplyDeleteThis post is really nice and informative. The explanation given is really comprehensive and informative. I am feeling happy to comment on this post.
Kitchen contractor
Hi! Nice blog ..Thanks for sharing this information. Kitchen countertops
ReplyDeleteExcellent post,Your style of presentation is very impressive. I really love it, I think it will be help of all.Kitchen remodeling
ReplyDeleteIf you are planning to install a classy timber floor, you are at the right place.Timber flooring is an art form itself; one can see the desired result only if it is done by professionals.Floorsanding Gold Coast | Polished floors Brisbane
ReplyDeleteThank you so much for giving us such kind of handy content which will be most useful to me as well as others.Bathroom Remodeling Tampay Bay
ReplyDelete
ReplyDeletewe have recently designed a few kitchens and baths with bold,
vibrant colors – especially greens and blues. The use of color in these designs is visually stunning, adding charisma and vitality to the room.
Our clients highly value uniqueness and individuality and
their personal expression is interpreted within the design by using of various finishes, textures, color, and artwork.
Kitchen counters
The post is absolutely fantastic! Lots of great information and inspiration, both of which we all need! Also like to Logo design admire the time and effort you put into your blog and detailed information you offer! I will bookmark your blog and have my children check up here often.
ReplyDeletetafelblad
Awesome tips and looking good, you can even try Granite & Marble Countertop Shop,its really well and neat looking.
ReplyDeleteReally excellent post...and the given great knowledge..your post given great knowledge..
ReplyDeleteaanrechtblad kopen
This is very nice blog because information provided here through the article and the pictures are very effective. Because sometimes words cannot explain the things that pictures can and here the words and pictures both are expressing the things in balance.
ReplyDeletedouchevloer
I just read through the entire article of yours and it was quite good. This is a great article thanks for sharing this informative information. Its really good article i fully read this content..
ReplyDeletehttp://granieten-tafelbladen.nl
This is such a great post, and was thinking much the same myself. Another great update.
ReplyDeletedekton aanrechtblad
This is some awesome stuff i like it. I enjoyed reading your articles. This is truly a great read for me. I have bookmarked it and I am looking forward to reading new articles on the same matter
ReplyDeletedekton keukenwerkblad
Simple, useful and very Interesting Post. Keep it up.
ReplyDeletedekton keukenwerkblad
This comment has been removed by the author.
ReplyDeleteI am considering Ikea wooden countertops. I have a question, though. If I am happy with the color they sell, would I need to sand and stain? Or could I just jump right to the waterlox application? Thanks!
ReplyDeleteI’m encouraged while using surpassing along with preachy list that you just adorn such minor timing.
ReplyDeleteButcher Board
I would like to thank you for the efforts you have made in writing this article.
ReplyDeletehttp://byebra.com/product/bra-stickers/
Hi! Nice blog .You have done a great job. Keep on working.
ReplyDeleteHello Dear,
ReplyDeleteI have visited your website which was really good,I never seen blogger who managed their blog so nicely other should learn from you guy's, I read your post and it seems that you have not posted anything new since long time..this Blog is really good as tourism guide we can seen various Tourism vacation here..
napa wine limo tours Sonoma Limousine Services
good
ReplyDeletei have seen you post for home furniture and i have seen entire post pictures which is nice to see it...stylish office furniture | designer end tables and nice post keep doing well...
ReplyDeleteallegiant subtitles download
ReplyDeleteHow are the countertops holding up (5 years later)? Any new advice in regards to maintaining the IKEA butcher block?
ReplyDeleteHow are the countertops holding up (5 years later)? Any new advice in regards to maintaining the IKEA butcher block?
ReplyDeleteWith the assortment of decisions for shading, examples, shades, and surfaces, a property holder won't require much inside planning of the kitchen counter tops. Having the capacity to pick distinctive rock shades makes it simpler to example or tailor with the general shading theme of the home.
ReplyDeleteNice post
ReplyDeleteit looks so great and your artical is best for us
do it yourself marble countertops
Butcher block countertop is the superior quality wooden material.I am happy with your suggestion pictures about countertops.
ReplyDeleteThank you so much for the complete explanation and information. LOVE how your kitchen looks! Thank you!
ReplyDeleteIts great and nice click in every angle.Get any kind of flanges from http://www.sainiflange.co.in/contact-us.htm
ReplyDeleteacross the world.
This blog is fascination one which makes everybody to stay in this blog page itself. I am also grasped by this blog and i want to thank for the endeavor who posted this. I am eagerly waiting for your future blogs.
ReplyDeleteCrane Services in Chennai.
Awesome counter tops, thanks for sharing.
ReplyDeleteCustom Kitchen Sinks
Zinc Bar Top
Custom Kitchen Sinks
nice post.
ReplyDeletegranite cleaning services