 |
| Sports Linkup |
Creating white hobnail Easter eggs was not only more successful than creating plaid Easter eggs, it was also much, much easier and less time consuming. So, if you create any of the Easter egg tutorials I post this week, I strongly recommend that you put this project at the top of your list! Here are a few shots of my white hobnail Easter eggs:
And here is the tutorial (which was inspired by Young House Love's puffy-painted Halloween pumpkin tutorial):
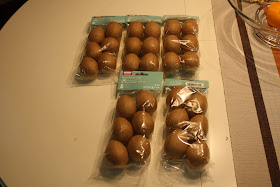
Buy some paper mache or wooden Easter eggs. I got mine at Michael's - each bag cost $2.50 and included 6 paper mache eggs. You can recreate this project with real eggs, however I chose to go faux so I could keep these eggs as my "go to" Easter decor.
Now, the fun part.
Buy some puffy paint - any color will do (although I went with white to keep things simple). Puffy paint designs of little dots onto your eggs - there's no wrong way to do this:
If you're still feeling uncertain, google pictures of "white hobnail glass." Let the paint dry (this will take at least an hour to dry). BTW, I created the drying board out of styrofoam and push pins. Each egg is resting on four pins (this was totally a Martha Stewart idea, if it wasn't already obvious enough):
Once your puffy paint is dry, spray paint the eggs white:
And keep any curious dogs away from the drying eggs.
The hardest part is being patient and letting the paint dry. I was getting impatient with this, especially after completing the tortuously long plaid eggs, so I ended up with a few smudged spots because I didn't let the paint fully dry. But overall this is a very easy project and if you have kids, I'm sure they'd love to help with the puffy painting part.
I bought some green Spanish moss from Michaels (the package cost around $3 or $4) and I placed this inside my largest and prettiest apothecary jar:
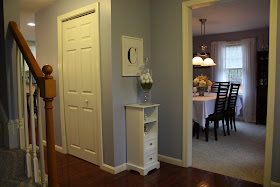
The jar full of pretty white eggs is on display in our entry hall:
I was really, really happy with how easy this project was and how well it turned out. If you're feeling adventurous, check out my plaid Easter egg tutorial here...and may the force be with you. (I can't believe those words just left my mouth - I loathe Star Wars or whatever movie that line is from).
Stay tuned for yet another Easter egg posts this week, along with my first ever giveaway!!!!
I will be sharing this post at the following parties this week - stop by and check out some great ideas generously shared by many other fearless, fabulous DIY bloggers out there!


Hi Erin I LOVE IT, they turned out so pretty!! Love how you displayed them. Martina
ReplyDeleteI love this!!! I need to do this some time! :o)
ReplyDeleteThank you!!
~Terry
www.mossandclover.blogspot.com
OMG, how cute are those. Great idea.........spring-like but not over the top Easter-ish. Love it.
ReplyDeleteThese are super cool! What a great idea, I might need to borrow it. Thanks for the tutorial.
ReplyDeletevery pretty and original. a real break-away from the traditional. thanks for taking the time to put up a tutorial
ReplyDeleteWhat a brilliant idea and I love the outcome. I collect milk glass and have several hobnail pieces and adore the effect you achieved with these.
ReplyDeleteThis is a FABULOUS DIY tutorial!! I've been looking for a good Easter project and this is RIGHT up my alley! Thanks for sharing!!
ReplyDeletep.s. love the blog too.
Kimberly
thirdfloordesignstudio.blogspot.com
those look really nice! love how you used the jar as your inspiration!
ReplyDeleteI am having a fine art photograhy giveaway by Melanie Alexandra. She has more than 200 images in her store to choose from. Just leave me a comment telling me which is your favorite image for a chance to win.
http://houseonashwelllane.blogspot.com/2011/04/fine-art-photography-giveaway-by.html
I love this idea! thank you for sharing!
ReplyDeleteCute little eggs, great idea!
ReplyDeleteLinda
Stunning doesn't begin to describe these! I'm going with a mostly white/black theme in my living/dining room so these are perfect! Just when I thought I was FINISHED making Easter decorations! Haha! Thanks for great pictures and tutorial!
ReplyDeleteThose are so pretty, I would display them all year! I'd love to include them in my Wednesday 'Visiting Other Nests' post about other bloggers' bird/nature themed projects.
ReplyDeleteThanks everyone for the super sweet feedback!!
ReplyDeleteAnne - I would love it if you included this post in your "Visting Other Nests" post - I'll be sure to stop by and check it out! :-)
How clever and creative! Excellent tutorial and I absolutely LOVE your home...just beautiful!
ReplyDeleteThose ae super sweet! Lovely job!
ReplyDeleteThanks for linking up to Making It With Allie! I can't wait to see what you have for next week!
AllieMakes.Blogspot.com
Oh...my...word! I LOVE these eggs. How pretty and unusual! I can't wait to make them!!!
ReplyDeleteThanks!
Fondly, Tami
www.thisandthatfromtami.blogspot.com
Love these so much! Thanks for the tut!
ReplyDeleteI'm sure your dog wouldn't mind eating one of those eggs.
ReplyDeletelisa
Borgata Hotel Casino & Spa, Atlantic City, NJ - MapYRO
ReplyDeleteHotel Map 의정부 출장마사지 of 포천 출장샵 Borgata Hotel Casino 제천 출장안마 & Spa in Atlantic City, NJ. A map 의정부 출장안마 showing Borgata Hotel Casino & 광주광역 출장마사지 Spa in Atlantic City.